Beauty, Garden, Herbal Remedies, homemade, make your own, plastic free, recipes

Lavender Vinegar Hair Rinse

I was surprised by the pink colour that comes from the lavender

Lavender Vinegar Hair Rinse. Use instead of conditioner.

475 mls vinegar vinegar

2 tbs dried lavender flowers

glass jar with non-metal lid

Directions:

Place dried lavender into glass jar.

Pour vinegar over the lavender.

Cover with non-metal lid (vinegar ruins metal lids).

Let sit in a cool dark place for 1-2 weeks.

Strain out the lavender.

Store in a glass bottle away from direct light.

Put 2 Tbs of the lavender vinegar in 235 ml water.

Pour into hair after shampooing.

You are using instead of a conditioner. Leave in for a few mins. Lightly rinse.

breakfast, food, homemade, make your own, plastic free, recipes, simple living, vegan, vegetarian, Zero Waste

Protein Porridge

SLO Food : make your own Protein Porridge, Healthy Brekky in under 5 mins.
Inspired by Jamie Oliver’s recipe in Everyday Superfoods cookbook which I rediscovered languishing in my bookshelf. Loads of recipes to try out and this was just one. Also made his Rye Soda Bread which was very yummy as toast with scrambled eggs as another protein rich brekky/brunch .

Making your own brekky mix saves you money rather than buying from the shops. You can make it your own by changing up the nuts/seeds, fresh fruit you add and the milk you use.
It is a versatile mix and you can add it to your smoothies and to pancakes, or sprinkle on your cereals to boost your protein and all those lovely nutrients from nuts.

These are the ingredients I used from my pantry. It makes up a lovely big batch that I keep in a large Maconna jar ready to grab, pop in a bowl and it’s ready to eat in about 3 minutes.

400g oats – or use other porridge grain ingredients like rolled rye, rolled rice
100g LSA mix (Linseeds, Sunflower Seed, Almond)
150g nuts of choice – I used walnuts, couple brazil nuts, cashews and a few more
almonds
50g chia seeds. you can use quinoa
2 tsp vanilla extract
2 tsp cinnamon
3 Tbsp Milo you can also use Ovaltine, malted powder

Basically you blend the above, I did mine in the Nutribullet because that’s what I have. Do in a couple of batches but don’t overblitz it.

Pop it in your jar and it will keep for at least a couple of weeks.

TO SERVE
I use 1/3 cup of the mix
1/2 cup milk of choice
give it a little mix – microwave for 2 mins
Mix and add a couple of dollops of yogurt of choice and some fresh berries or banana/mango or whatever fresh fruit takes your fancy. You can also add some more chopped nuts on top for a bit of crunch.

We have used this in smoothies, added to pancakes and my daughter added some to her “normal” porridge.

I am able to get most of my ingredients from a local Health that has loads of cereals, grains, nuts, dried fruit in bulk bins. So I take my own bags, fill up and decant into containers when I get home. so Zero Waste/plastic free. I am yet to make my own vanilla essence , although it is easy I am unable to source good vanilla beans. It is certainly on my to do list.

Milo we still buy, it is just delicious in a big glass of milk, and I figure it’s a good/bad – it has added vitamins and minerals, is yummy in banana smoothies, and is also really good over a generous scoop of icecream with fresh berries. Yum! It comes in a steel container which is reuseable for storing other things, is great as a planter for succulents – or it goes into the recycle bin. We probably go through a large tin every 6-9 months.

food, homemade, make your own, plastic free, preserving, recipes, simple living, vegan, vegetarian, Zero Waste

Homemade Dried Apple Slices

Dried Apple slices made this morning to use up some older apples rather than they go to waste. A simple way to preserve apples. Simple plastic free snacks.

No need to core, just slice apples thinly, remove seeds, pop slices on a tray and place in oven on lowest temp for couple hours. (about 70°C my oven just has a stay warm setting so it went on that). About halfway through I cracked open the oven door to let the moisture out.

While they are drying you can get on with other things, like gardening!

Set a timer so you don’t forget them or you’ll have apple chips!
Cool on cake slice before placing in jar.
I left the skin on mine and they have gone wavy rather than sit flat, but still taste delicious. Only problem is not eating them all at once.

food, Garden, homemade, plastic free, preserving, recipes, simple living

Preserving Beetroot, Corn, Zucchini

Pickled Beetroot recipe below, and Preserved peaches

The peaches and zucchinis all did their thing so well this year we had to spend some time preserving so we have some for later. I also made Zucchini bread and butter pickles and more bottled more peaches (from our garden) and apricots (which we bought by the box from a local orchard). Now we have a well stocked pantry. Very satisfying to know I can make my own and reduce my dependence on the supermarket for some of the things we eat.

Apricots – still learning how to pack tighter so they don’t float after processing – it’s an art that’s for sure. Not bad for first go.

I also preserved some apricots and as corn was so cheap, cut the kernels off and froze. you can Fowler those as well but I will need to read up on the how to for those.

Learning new skills is good for your brain so am jumping into using the Fowler Vacola Bench top plastic electric preserver. I have joined a Facebook Group Fowler Vacola Users which is fantastic for staying motivated and learning. loads of recipes to try as well as having the most up to date how to use your preserving kit. the other members are more than happy to assist and generally someone will respond within minutes. A great sense of community and I love seeing what the more experienced members are doing. Did you know you can make puddings and then Fowler them for storage in the cupboard! Choc self sauce puddings here we come!

Freezing corn – as simple as cutting of the kernels and popping into a jar

PICKLED BEETROOT
The beetroot I made in February, for the first time using the recipe from one of my friends, you don’t need to process in the Fowler, and it is really simple, boil beetroot, slice and cover in your pickling vinegar. Have cracked our first jar, delicious, clearly I will need to make more.

3/4 cup water

1 1/2 cups white vinegar

1/2 tsp peppercorns

1 bay leaf (optional)

2 whole cloves

1/2 tsp mustard seed

1/4 tsp salt(optional)

1/2 stick cinnamon

3/4 cup sugar

Trim beetroot but don’t cut into the bulb or it will bleed

Boil beetroot until just tender

Put in cold water, peel off skin, top and tail and slice, dice or wedge, or you can grate

Put all ingredients in pan, bring to boil 5 mins, strain liquid and cool slightly

Sterilise jars

Fill jars with cut beetroot, then fill with the vinegar mix

I used a bit less sugar and add extra vinegar to top up the jars if needed (warm it first)


On the list for learning is bottling pineapple to replace the canned pineapple we buy, , Worcestershire sauce well, just because I found a recipe ,and I have discovered you can also make puddings in the fowler jars, process them and then they store in the cupboard. The things you learn.


So as I need more jars, I went out and retrieved all my fowler jars from the garden shed that I have been using in the garden for covering seedlings in winter. New jars are expensive! 4 pudding jars! 10 normal and 3 NZ Agee ones that I will need to source screw lids for.


Really need more hours in my weekend for pursuing this simple life.

chutney, pickles, jam, homemade, make your own, preserving, simple living, vegan, vegetarian, Zero Waste

Homemade Sweet Chilli Sauce

This recipe is one I saved from an old 2006 magazine, Australian Table I got from the Op Shop a couple of years ago. Taken me a while to get around to make it. The push has come from the growing collection of Sweet chilli sauce bottles and the decision to reduce one more source of waste going into the recycling bin.

Makes 2 cups. It is not as thick as store bought as there are no thickeners

Ingredients

125g birdseye chillies. I used longer red chillies that are not as hot!

4 garlic cloves, chopped/minced

1 tablespoon grated ginger

1 1\2 cups sugar of choice

1 1/2 cups white vinegar, next time I will use Apple Cider vinegar as I can get refills, being darker it will impact on the final colour.

Safety first…remember you will have chillies on your fingers so ensure you don’t rub your eyes! Wash hands well.

I put some olive oil on my fingers before prepping the chillies and had a bowl of soapy water next to me as I worked.

Method

Cut in half the chillies, scrape out seeds with a teaspoon if you don’t like it really hot. chop chillies.

Mix chilli, garlic, ginger, sugar and vinegar in stainless saucepan.

Simmer 45 minutes, until soft.

Cool before pureeing until smooth. Season to taste.

Reheat then pour into warm sterilized jars and seal (I use the oven method to sterilise as I find it the simplest, see that post for the how to)

Once opened, store in fridge.

Enjoy!

All of the above ingredients apart from white vinegar I can purchase plastic free. The white vinegar I buy in the biggest plastic bottles I can, and also use in my cleaning products. I do refill the bottles with homemade laundry liquid and I also have one full of laundry liquid from my local bulk store and one with homemade laundry spray.  The excess plastic bottles go into the recycling bin. I am yet to find anywhere local I can refill white vinegar. It is on my list. I refill apple cider vinegar from my local bulk store. It is however more expensive for using in cleaning products, so use mainly for cooking.

Have kept a few of the chilli seeds to try and grow my own.

chutney, pickles, jam, food, homemade, make your own, preserving, simple living, vegan, vegetarian, Zero Waste

Making my version of Passata (fresh tomato puree)

Have reposted as I will be making Passata again this week.  click on the link at the bottom which will take you to the recipe.


chooktherapy

The recipe I use provides bottled fresh tomatoes, onions, garlic and a few other things so that its good to go without adding anything. I am pretty busy with work, Girl Guide leader and I prefer to be in the garden rather than cooking, or losing myself online with pinterest or collecting and transferring all my recipes and other interests into my blog. One central place to capture getting back to simple.

I bought a 10kg box of tomatoes last week, so far have made my tomato chutney, see the post for that recipe; tomato sauce (ketchup) still to write that post and yesterday my daughter did all the hard work of chopping 4kg tomatoes and starting the sauce so it was half cooked by the time I returned from work.

Then it was a matter of the sauce bubbling away until it reduced, sterilising jars and bottling with some…

View original post 355 more words

Beauty, chutney, pickles, jam, cleaning, food, homemade, laundry, make your own, mindful consumption, preserving, simple living, Uncategorized, Zero Waste

Simple living results in using less plastic…

Saw this picture above from LessPlastic UK, and it got me thinking of the changes I have made but also how easy it is to start to make changes. here’s their website they have loads of other tips

Refill laundry/shampoo/conditioner/dishwashing liquid, liquid, Castille soap at my local store Moana Natural Health & Organics they have a small range but it does me.

I also make my own laundry   liquid, you can make laundry powder and I make my own laundry spray as I don’t use bleach.

Very simple to make your make your own deodorant paste, lotion bars, and creams/lotions. Some people just use almond oil as their moisturiser.

Deodorant paste

Clothing and household goods. Check out op shops/charity shops for natural fibres like cotton/linen and wool. Unbelievable what people throw out, I have bought brand new leather boots for $10 a couple of years ago, still going great. Also great for cutlery/plates/bowls books jewellery handbags.

Make your own dishcloths from old teatowels, stop using plastic scrubbers you can buy stainless and copper scrubbers from supermarkets, my local at Seaford Foodland has them in a cardboard box..no online purchase that comes in extra packaging. Go into a physical shop, take your own bags, make do with what you have, find something second hand or see if your friends/family have what you are looking for languishing in their overstuffed cupboard/drawers. Reuse glass jars for storing

Cook your food from scratch, make snacks like museli bars, protein balls, to cut back on plastic and save money.

You can Search my facebook page Simple living in Onkaparinga (S.L.O) for links/recipes or search in this blog chooktherapy for ideas/links to websites/blogs.

Can’t find what you are looking for, ask me questions, I’m still trying to work all this out too, so let’s share ideas.

I have made changes based on moving back to simple and part of that is conscious consumption, being creative making my own food, jams, pickles, chutney, cordial, bread, beer (hubby) household cleaning, growing fruit/veg, herbs.

T

This has been change over many years, and have been getting more serious about moving back to simple about 2 years ago, slowing down, getting back to basics while working full time, volunteering as a Girl Guide Leader, wrangling a few chooks and chilling out in my veg patch in suburbia.

Kym

food, Herbal Remedies, homemade, make your own, science, simple living, Thoughts, vegetarian, Zero Waste

Cinnamon, not just for cakes…

I was recently introduced to honey and cinnamon in warm water for a sore throat. Note if using cinnamon medicinally like this consume in small amounts, I also learnt there are two different types of cinnamon with different recommended daily intakes, see below for more info.

Having finally succumbed to the common cold which had been lurking since beginning of the previous week, it finally took hold Sun afternoon.  One of my friends  suggested honey and cinnamon in warm water for my sore throat. Never heard of this, however seeing she is one of the wise women in my life, I listened.   Me being me and stuck at home so I didn’t infect everyone at work, decided to have a look for some evidence behind the claims, whilst sipping my very nice and soothing honey and cinnamon drink.

Some of the articles I read refer to honey and cinnamon as having Ayuvedic origins, used in Chinese medicine, more extensive research papers were looking into using cinnamon for some cancers and many more other links to anecdotal references. With all natural remedies I am more concerned re potential harms of too much of a good thing and the potential interaction of natural products with medicines you may be taking. Just because something is natural does not mean it is necessarily good for us.

This is where science assists and there is generally someone who has already done their science homework. I like to read lots of articles and then make up my own mind. This article (Honey and cinnamon : A Powerful cure or a big fat lie  ) seems to have done their research. Interestingly there are two types of cinnamon, the cheap Cassia cinnamon we get from the supermarket and true or Ceylon cinnamon, which is more expensive and harder to find.

The article indicates they would not suggest consuming in large amounts daily as can be toxic! Generally we only use in baking so not a problem. However if you are going to use as medicinal like in a warm honey and cinnamon drink, then limit the Cassia one to 1/2 tspn daily as it is suggested this is not so good for us and the more expensive Ceylon cinnamon to no more than 1tspn day. Lucky for me I had only put in half tsp of the Ceylon cinnamon before reading this article, so I could have another a bit later in the day.

I also recently discovered I can refill my cinnamon spice jar at my local Health store with the true cinnamon.  They had previously advised me there were concerns around the cheaper cinnamon, which I did not think too much about at that time, was just glad I could get it plastic free!   It does have a more intense cinnamon smell though and it does taste different, more “cinnamony”.

So there you go, this fits my Simple Living philosophy of returning to simple things, remedies. It was a lovely warm drink and it has soothed my sore throat…for now.

Like all things, have a read of this then do your own further reading. My daughter is now currently lost in reading scientific papers about cinnamon and medical trials.

Here is a link to her post about cinnamon  Cinnamon : Bacteria Killer?


cleaning, homemade, make your own, simple living, Zero Waste

Lemon and baking soda fizzing toilet cleaner


toilet cleaner

Lemon and Baking Soda fizzing toilet cleaner. Make your own. Simple.

Ok, no one likes cleaning the toilet, but it has to be done so it may as well smell nice and not contain harsh chemicals that impact on your health, and also this recipe reduces your waste containers. I like to keep it simple so rather than make this into bombs to drop in the toilet bowl, I just leave as a powder and use a teaspoon to put into the bowl.

You need

1½ cups baking soda (buy in bulk at Suntralis Lonsdale)
½ cup citric acid ( bulk Suntralis Lonsdale)
1 lemon, zested (off my tree)
25 drops lemon essential oil
24 drops lavender essential oil

Mix all ingredients well, then place into a reused glass jar, leave a teaspoon in the container.
To use, place 2 heaped teaspoons of mix into bowl, leave for 5 mins, scrub and flush.
This is the recipe I have been using for a while and is a combination of various recipes from pinterest.

food, homemade, make your own, vegetarian, Zero Waste

Turmeric Peanut Butter protein balls

Posted this on my facebook page Simple Living in Onkaparinga last week

protein peanut balls

This is a hybrid of the various recipes for protein balls that can easily be found on Pinterest.

All of the ingredients below I am able to get from my local Bulk Food shop at Moana , so take my own bags/containers, so no wrappings or containers into waste or recycling.

Easy to make, Recipe:   Prep time 10 mins – Makes about 22

1 cup (120g) oat bran (blitzed rolled oats in blender)
½ cup (140g) peanut butter/or any nut butter
1/3 cup (65g) linseeds – I used LSA mix
1 cup (80g) desiccated coconut
1 teaspoon turmeric powder
1/3 cup (115g) honey
¼ cup (60ml) water
1 teaspoon vanilla extract

Method

1. Combine ingredients in large bowl; refrigerate for 30mins (optional)
2. Using damp hands, roll heaped tablespoons into balls, place in fridge or freezer until firm.

**Store in fridge for up to 2weeks or freeze up to 3 months, my rarely last this long as they go within the week.

I try to make some sort of protein balls for snacks each week.

This week will be Apricot Delight Blissballs which is  ricotta cheese, dried apricots and coconut, see post on this blog.  This recipe I don’t make as much anymore as the ricotta comes in a plastic tub, which I can recycle but…still looking for where I can get ricotta that they are happy to put in my own tub…

mindful consumption, simple living, Thoughts, Zero Waste

biodegradable/compostable bags

Biodegradable/compostable bags.


I saw a post in my Facebook feed today from an organisation about how great it is to have replacements for plastic bags, the biodegradable compostable ones. I am not a fan, it’s still plastic, petroleum based and it just breaks down into smaller bits of plastic.
I am not in favour of the increase in green selling as companies try to get a hold on a new market of people who are trying to make changes and thinking they are doing the right thing. Trying to be a conscious consumer can be hard work, do your homework, google the companies, inform yourself then make choices to ensure you are not using a product that still has issues.

For example, most bags have on them the company who made them. So if your biodegradable bags are made by Bio Tec, this is from their website, and note they are saying they are compostable…yes they are, however it is plastic and sourced from petroleum.

“…we manufacture compostable, biodegradable plastic bags from conventional polyethylene (petroleum sourced) plastics. The decomposition of the bag is achieved due to the embedded enzymes in our plastics.

Biodegradable polymers are generally recognized as those which are designed to degrade through the action of living organisms. BIOTEC BAGS® with enzyme compounded polyethylene constitutes of enzymes, sodium salts and oxidation agents with LDPE / HDPE AND LLDPE is a highly cost effective and eco-friendly non hazardous technology used primarily for making CARRY BAGS, GARBAGE BAGS, POLYETHYLENE LINERS AND FILMS…”

For me, it is an issue that it is still made from petroleum, whereas compostable 100% corn/maize etc is an entirely different thing to the biodegradable plastic bags

So to take the hard work out of it I follow people like Lindsay Treading My Own Path, she has a chemistry background, has been living plastic free/zero waste for some time. She’s done the homework about biodegradable/compostable and done a great job of explaining so you can make informed choices on the plastic bag issue. Also below is a link to her article about other reusable bags.

biodegradable plastic is it really eco friendly

https://treadingmyownpath.com/20…/…/29/better-reusable-bags/

“You cannot get through a single day without having an impact on the world around you. What you do makes a difference, and you have to decide what kind of difference you want to make”
Jane Goodall

Happy reading
Kym

homemade, make your own, mindful consumption, simple living, Zero Waste

Trying to live by The 5 R’s of Zero Waste

31416916_1805888276100011_7506199639322479198_n.jpgI was given Bea’s book as a present last year just before my 50th.  You can also borrow it from the library.  It is easy to read and  very detailed information on each of the 5 R’s.  Different recipes for making your own products.  Her website Zero Waste Home

If you haven’t read the book or visited her website and you are interested in reducing your waste and head towards zero waste, I highly recommend it.   She is the original Zero Waster who started living this way many years ago and has her waste down to a small jar, family of 5. Very motivating. Read her blog/book and then keep these 5 R’s visible to keep on track.
I came across her website and recognised I was doing some things but realised I was not doing enough to stop packaging going into the recycle bin, I needed to stop the packaging from coming into the house in the first place.  The biggest and hardest one R to get started on is Refuse, but it does have the biggest rewards.  Stopping the waste in the first place, so all the freebies from hotels, pamphlets, junk mail, plastic wrapping, or any wrapping on our food, things we buy online or in shops..do you actually need it? sample bags, pens etc much more detail in her book.  She provides plenty of tips on how to look for alternatives.
  My book is currently on loan to a young woman from work who is trying to make some changes. Her first big change was to stop buying new clothes/shoes/bags as she was throwing a lot away and realised she was spending a lot of money and wanted to redirect that money into paying off her mortgage and travel.
So, if you have started making changes and you still have a recycling bin full, go back to the first R,  look at refuse for each item in your recycling bin and start looking for zero waste alternatives based on the 5 principles of zero waste.   Just start with one item or it can become quite overwhelming.
Most of my recycling is now cardboard, tins, glass rather than plastic however I am still working on finding alternatives.  There is still a bag of soft plastics that goes in the Redcycle bin at the supermarket, happily this has reduced significantly, but more to be done for that to be not needed.
It is about becoming conscious around what is coming into your front door.  conscious consumption.
I am flying interstate for work next week, and it is incredibly hard to put these principles into action when flying and staying in hotels, will be interesting to see how I go. I think I might need to draw on my Girl Guide motto of Be Prepared combined with Bea’s      Refuse, refuse, refuse… so take my drink bottle, nuts/sultanas from home for the plane and hotel so I am not tempted by crisps, no takeaway food/drinks and  actually sit down and have a meal in a café/restaurant will certainly reduce packaging that will just have to go into landfill…lets see how I go…am determined to meet the challenge away from home.
food, Garden, seasons, simple living, Uncategorized, Zero Waste

Growing celery from an old plant.

You can grow your own celery very easily from the base of a celery plant you get from the veg shop. So instead of chucking it out or composting, cut the bottom off the celery,about 4-5 cm from the base. Place in a saucer of water and it will grow some roots and start to shoot from the middle after about 2-3 weeks.
Transplant into your garden, make sure you don’t bury it too deep, just enough to cover the roots, keep moist. Pick the stems from outside as you need celery for the kitchen.

I let my original plant go to seed a couple of years ago, keeping some of the seeds for pickling and I now have celery plants at various stages throughout the garden and the paths! They are easy enough to transplant if in the wrong spot.

Simple Living – you gotta love self seeding plants. Silverbeet and lettuce also pop up in random places as I let at least one of each go to seed and blow around the garden. Mine is a bit of a rambling veg patch

Some of the little seedlings will go over to the Girl Guide hall for our new veg patch, gardening is another life skill we are keen to pass on and also the girls can pick and add to the soups and other meals they learn to cook during the cooler months.

Beauty, homemade, make your own, simple living, Zero Waste

Making your own beauty products

26908078_2469256526632200_3905203315829034165_n

Making your own beauty products. Really easy and quick to make. Today I made Lotion Bars and Non-petroleum jelly.

Non-petroleum jelly is what you can see cooling in the jar.  It has the same consistency as petroleum jelly and you can use it in the same way.  Just no nasties in making it or getting on your skin

I will make lip gloss later from it, adding coconut oil and some beetroot powder which I found at Moana Natural Health & Organics. You could also add cocoa powder for a brown gloss. Both beetroot and cocoa powder can also be used on your face as eye makeup or blush. I will pop the lip balm in the little pot with the blue flower, which was an op shop score. Love op shopping!   You can also pour it into old cleaned out lip balm sticks or lipstick cases.
Finally also got around to making some more Lotion Bars. Gave some as Xmas presents to my family and I have just a tiny bit left.
I made mine in my glass jug, over pot boiling water on the stove top, made it easier to pour into moulds/jar.

I used an old plastic takeaway container, you can use ice-cube trays, I think though that they will be a bit hard to clean.   Last time I made the lotion bars, I used an old cardboard milk container. Mine are in the fridge cooling down before I can cut them into bars.

These recipes, I hope you can read them in the photo, are from Little House Living. She has some other amazing beauty recipes as well as household cleaning and medicinal recipes. Be sure to go and have a look.

For those that live in Southern Adelaide, the Shea butter I bought from Suntralis Foods at Lonsdale; coconut oil I buy in big jars from Seaford Drakes Foodland and also use it in cooking, beeswax you can get from Adelaide Bee Sanctuary, I’ve been told you can get it from Bunnings Noarlunga, must admit I’ve not seen it there.  I got my last lot of beeswax from a friend who has a beekeeper friend.  I also used the beeswax for making Beeswax wraps with my Girl Guides.  Think I have a post for those.

I don’t add essential oils to either of these recipes,  as I prefer it unscented.
One of my friends uses the lotion bar as lip balm, I love it on my arms and neck. They are both great for rough summer heels.

About an hour later :   here are the photos of the hardened lotion bar,  and on the right, cut up they are good to go.   One little bar lasts for quite a while. You basically pop it in your hand and glide it over your skin, rub onto your lips, or wherever.   Great for working hands too, my skin loves this lotion bar after a day in the garden.

I now only have a few store bought moisturisers left, that have been previously given to me as presents. I can’t stand to throw them out, just seems too wasteful.  So once they are gone, the packaging goes into landfill, unless I can find a local Teracycle to take the empty containers to, these bars will be what I use.   I like making my own products, it is very satisfying, it reduces the waste coming into my home and I know what goes into it and then onto my skin..

I know some people just use olive oil as their moisturiser, I find that a bit too oily in summer particularly on days like today 41 degrees Celsius.  Hot northerly breeze, just like standing in front of an open fan force oven.    However,  olive oil is nice in winter.

I also like the idea of having less products in the house and ones that can have multiple uses. Like cornflour which I use in making deodorant, which as a side note, I do have to say is working a treat on this very HOT South Australian day.  No pong, and I have not had to replace it yet, however my old roll on deodorant I would have had to have reapplied multiple times.  Definitely worth making.

Note:  You do need to keep these Lotion bars in a cool place especially on a warm day, I have added a bit more Shea butter to this mix today, as it has a higher melt point.

Give making your own products a go.  These are a simple first project as you start to let go, move towards a simple life; reducing chemicals on your skin; reducing plastic and waste, and gaining satisfaction from creating something yourself.  Enjoy

Beauty, deodorant, Herbal Remedies, homemade, make your own, simple living, vegan, vegetarian, Zero Waste

Deodorant paste: Make your own

18723208_278303692633672_6812375089930043392_n

I have been making my own geranium oil deodorant paste again since about June 2017. I used to make a different version many years ago, pre child so over 20 years. I have just made another batch this morning as I had run out and went back to using an aluminium free deodorant I had in my drawer.    Well, let me tell you, it did not work with this hot weather we are having, and I know my homemade deodorant does. Nothing like being given a reason to get motivated. Seriously it took less than 5 minutes and I don’t have to throw away the container when I run out.  Simple as heading to the pantry and remake.

The recipe I use is based on articles I have read which are all very similar and easily found on the net.  TreadingMyOwnPath has recently come up with a Bicarb Free Deodorant recipe if you find you cannot use bicarb, as it can irritate the skin for some people.

If you live south of Adelaide, you can purchase bulk bicarb,  cornflour (and Shea Butter, which I use to make my own lotion bars, see separate post for that) at Suntralis in Lonsdale, as well many other things like flours, lentils, dried fruits and beans.     You can also access bulk products at Moana Health Store.   Both stores are more than happy for you to take your on containers/bags for refilling. That way you do not have any packaging to recycle. Zero waste.

The version of deodorant paste I use contains bicarb and is very simple to make

1 Tablespoon bicarb soda

4 Tablespoons cornflour or arrowroot

2-3 tablespoons coconut oil (You may need to melt the coconut oil if it’s a little bit solid to help mix)

1-2 drops of geranium essential oil or oil of your choice

Mix all ingredients together and put in a couple of drops of essential oil of your choice. Place in a small glass jar, and apply a small amount, about the size of a pea, rub into underarm.

When it’s a warm day, you can keep it in the fridge, however I find that keeping it in the bathroom is fine.

Until your body adjusts, you may need to apply later in the day, particularly in summer. I take mine to work just in case I need to refresh. (keep the lid screwed on tight especially in summer) You may need to remix in the jar occasionally. I keep a popstick handy for this and also for getting a small amount out each time I need to apply.

I use geranium oil (this link has the important health information so make sure you check it out and make sure it is safe for you) , as it is said to have deodorant qualities, astringent, good for stress, reduce inflammation and irritation.  (Note it is not recommended if you are pregnant or breastfeeding, in fact, many essential oils are not recommended ).    It is what I used all those years ago, and it works for me.    Others use tea tree oil, however I am not fond of that aroma.     If this recipe doesn’t work for you,  there are plenty of alternatives that mean you are not throwing away containers when you have finished your deodorant.     Please ensure you follow the link and find out about essential oils and using it safely.

You may need to melt the coconut oil if it’s a little bit solid, however mine was liquid as it is a tad warm today…going for a top of 39 degrees C and I am yet to put on the air conditioner.

So have a go at making your own, and giving this deodorant a try. If you use one of the commercial brands of deodorant paste then you are pretty much already there. This saves you money, you are reusing jars and no waste for landfill or the recycling bin.

28.4.18 Going to try a batch with tea tree oil for my husband who wants to give this a go, he is finding shop deodorant is irritating his skin. I will increase the ratio to 1:6 which many of the blog’s I have read recommend, for his first batch as sometimes bicarb can also irritate the skin. might need to do a bit of blogger research and check out bloke home made deodorant recipes if this does not work for him.

food, homemade, make your own, vegan, vegetarian, Zero Waste

Cashew Cream “icing”

The ongoing project of collating all my online “stuff” into one spot is slowly coming together.    Have copied the recipe from the website where I found it back in October 2017, there are lots more yummy recipes to be found on that website and I have popped the link below.

Notes from Oct 2017  :

Ok, challenge of the year.  Domestic goddess I am not and it’s hubby’s 60th tomorrow.  I have made the no sugar, no butter carrot and walnut cake which I used to make years ago when we lived on the boat;  but what about the icing my daughter cries!!!   

Found this recipe for Vegan Maple Cashew Cream Cheese Frosting over at  cottercrunch


Ingredients

  • 3/4 cup raw cashew halves
  • 1 tsp vanilla extract
  • 1/4 cup maple syrup
  • dash of sea salt
  • 1-2 tsp cinnamon
  • 1 tsp lemon juice
  • 1 tbsp coconut oil or melted vegan butter spread
  •  

Instructions

  1. First soak your cashews in purified water for 1-2 hrs.
  2. Next remove cashews from water then combine cashews and vanilla in food processor or blender.
  3. Blend on and off again for 5 minutes. Scraping sides.
  4. Once smooth, remove from processor and stir in remaining ingredients.
  5. Stir/Mix until thick like texture frosting is formed.
  6. This makes a small 1/2 cup batch. Feel free to double for more!
  7. Store in fridge until ready to serve. Thaw out for 20 minutes before spreading onto cakes or muffins.

Be sure to check out cottercrunch.com for more great recipes cotter crunch gluten free recipes.


 The “icing” was simple to make, and everyone who has a sweet tooth loved it.
I used tap water; honey instead of maple syrup because that is what I had, I don’t use maple syrup as I cannot get it refilled anywhere, whereas honey I can take my containers to Moana Health shop and get my honey refills.;  and most importantly of all,  everybody loved the icing.
homemade, laundry, make your own, simple living, Zero Waste

Make your own Laundry Stain Remover

Miracle-Spray
easy to make laundry Stain remover that works.   I came across this recipe originally in Grassroots magazine.
The photo above highlights all of the things I am trying to remove from my life as I move towards removing plastic but more so regarding minimising the waste, so I no longer use gloves, now use cotton cloths instead of plastic scrubbers. Plastic scrubbers cannot be recycled and end up in landfill. I certainly have kept plastic empty spray and other laundry bottles to keep my own products that I make.
I am looking for a non plastic handle brush to replace my plastic one – so it is little steps to change over.  (Update Oct 2018, I found wooden handled brush with replaceable head)
So step one is have a look at the ingredients, grab them over the next couple of weeks when you shop and then when your spray runs out make this up and use, or buy a sturdy spray bottle (not the cheap ones as they break down pretty quick and leak)
Washing stain remover:
1.5 litre water (1 cup boiled),
300ml vinegar,
60ml dishwashing liquid,
25ml eucalyptus oil
3 dessertspoons Lectric Washing Soda (find this in the laundry isle of most shops)
Mix the Washing Soda with 1 cup boiling water, dissolve.
Add remaining ingredients.
Pour into 2 litre bottle.
Decant into spray bottles for laundry stains
I also use this for my benches and you can also refill old toilet cleaner bottles to squirt under the rim in the toilet bowl.
I use this as my laundry spray and find it works well on underarm deodorant paste stains.
food, make your own, Zero Waste

Almond and Cashew “milk” make your own, very easy

Interested in making your own nut milk? Thought it was too hard?  Then I have found the recipe for you.

Very easy to follow recipe for cashew, almond and you can make seed milk too.  I have not tried the seed milk yet. We have tried shop almond and soy milk but they are full of sugar and salt and other interesting numbers in the ingredient list and are way too sweet for my taste buds. There is also the issue with having a container to dispose of into the recycling once you finish the milk, which no longer fits with my move to reducing waste.  So we stopped buying it.

You need to soak raw nuts overnight. You will need a piece of cheesecloth or similar (a new rinsed chux works) and prep those glass jars stuffed in the back of the cupboard. I use passata  (crushed tomatoes)  jars

Below is also a picture of the yummy brownies you make using the left over almond pulp from when you make almond milk…brilliant.   Link to the recipe below, which is also where I first found how to make nut milk.  I love it when someone has done the thinking for me as I had been wondering what to do with the pulp apart from feed it to the chickens or compost it.

I currently get my almonds and cashews from the bulk food store at Moana and also my local Foodland has a bulk food section that stocks some Australian nuts and dried fruit. I take my own bags (paper bags/old bread bags/old plastic veg bags) or will grab the paper mushroom bags, as I am trying not to bring in any new plastic bags to the house.  I then store them in glass jars when I get home

The article says the milk would last for about a week in the fridge, but ours does not last that long as it gets used up within 3-4 days.

Here’s a photo of the first almond milk I made a month ago.   Just almonds and water, no additives, no sugar, no salt or other things like in the commercial products. The pulp is on the right of the photo.19247977_10210232947275611_8988095387356743841_n

ALMOND MILK RECIPE

Soak 1 cup of raw almonds overnight in water, I use tap water but you can use whatever you like.

In the morning, drain and blend with 4 cups of water.    ( I use my juice blender, just put the almonds in with a little bit of the water first, whiz, then add more water. seems to blend better.

You then need to pass the mix through a piece of cheesecloth or similar – even a clean chux works.    I find it easier to do this on top of a jug (hold the cheesecloth with pegs or another pair of hands ) so I can then just pour straight into bottles

I now store mine in passata bottles.  Just make sure you shake prior to use to mix as some of the mix will settle to the bottom.

Don’t throw away that almond pulp, you can make very yummy brownies with those, see the link below.  You can also add it to thicken soups, add to veg burgers etc


CASHEW MILK

Same quantities and process as for the almond milk, however no need to sieve out the bits as it is finer, you can if you like, try it first without.   I find the cashew milk a bit creamier and it works better in coffee.

Here is the link to the yummy brownies from my favourite blog Treading My Own Path, they worked a treat, my normal brownie recipe has been ditched.

treadingmyownpath.com

make your own, Zero Waste

Moving towards No waste…ideas to keep motivated

If you have started to make some changes or want to but know where to start, here is a link to a list of 31 things to reduce waste, ranging from very easy to a bit more time needed.  It is useful to dip into to keep motivated and also think of some new ideas to add to the list of changes to make.   It keeps me inspired to keep living my new life of moving to no waste

You will be surprised how many things on this list you are probably already doing. Some of the things are very easy to do or start doing and this article has some great links to make life easier:

like taking your own bags when you go shopping,

making your own museli bars,

taking your lunch to school/work,

making your own washing powder.

there are links on my blog under Make your own for jams/bread/food/cleaning/beauty/bathroom and I will be adding more as I try them and add them to the things that work for me

Although to make the apple scrap vinegar suggested in this article from Pip magazine probably needs a bit more time from me to get my head around it.  I like the idea of it so I will add it to my poster on the wall of things I am aiming to introduce.  Although I am going to have to fight the chooks, guinea pigs and worms for the apple scraps…  Happy reading

Image may contain: food

Pip Permaculture Magazine

· July 6 ·

Plastic Free July challenge has us getting all fizzy over Apple Scrap Vinegar for cleaning and cooking purposes… check out our 31 plastic-free hacks to help reduce waste in your home…
http://www.pipmagazine.com.au/…/plastic-free-july-advent-c…/

Keep moving towards waste, little footsteps

Kym

make your own, Thoughts, Zero Waste

It all started with the bathroom declutter: now making my own deodorant, shampoo and conditioner

Updated from original post on Facebook 10th July 2017 when I was on holidays

Today’s ramblings, it’s a long one so grab a cuppa, take a mini break with me as I sit in the sun on my bed, soaking up the sun – gosh it’s great not to be at work!

It was an article from one of my newly discovered bloggers Treading My Own Path, about simplifying the bathroom routine, getting rid of unnecessary products and packaging, making your own shampoo, conditioner and deodorant that kick started my move back to simple in early June.  Lindsay, has been living plastic free for some time and it was clearly the motivation I needed to re discover my younger self that had tried to do many of these simple things years ago in my early 20’s. However without the abundance of information, sharing and sense of community to be gained from social media sites today, I guess I got a little lost.

The sense of disconnect between where I wanted to be and what I was doing had been growing for the last 5 years or so, I remember talking to my Social Worker about this disconnect and not really knowing what to do about it. I had been making small steps but seemed to be going backwards when I looked at the growing amount of waste we were creating each week. His words were always that the time would be right to make changes that were sustainable. I would know. He, as usual, was right.

Anyway, since June, I have been making bigger changes. There is also a determination to stop the waste coming in to the house in the first place, my recycling bin is now no longer overflowing – in just a couple of months I’ve made a bit of a difference – however still a long way to go as I work out how to replace or remove items completely – the concept of not wanting to pay for waste really resonates with me . Sustainable change takes time.

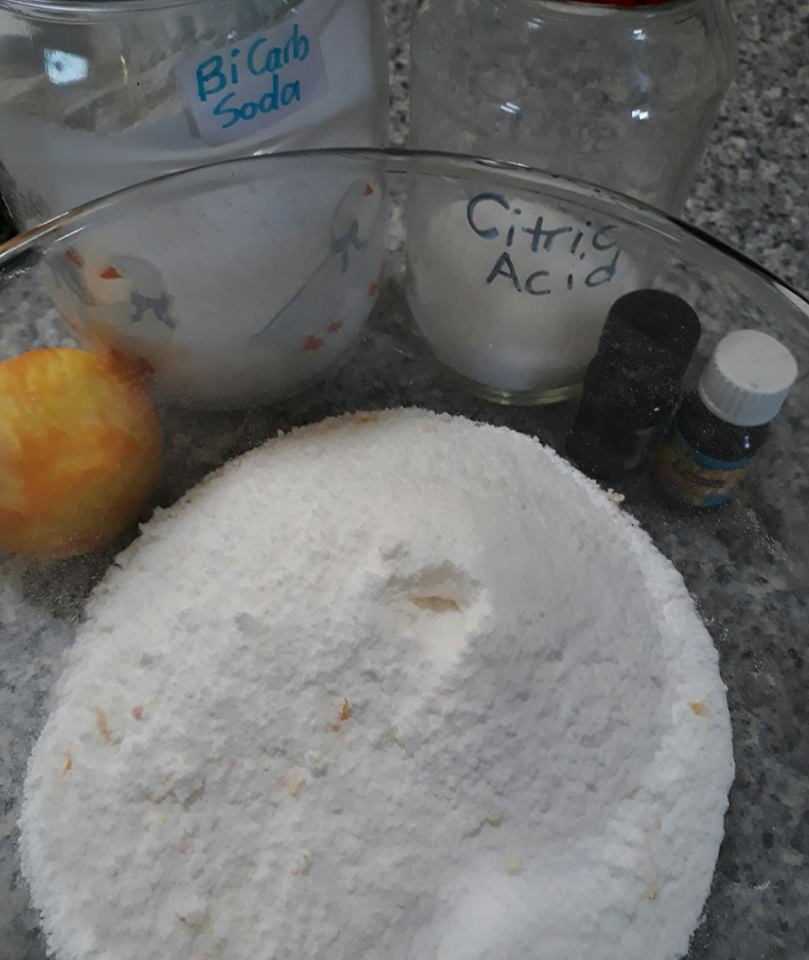
The Bathroom was the first place I tackled based on the article: I now only use bicarb soda (shampoo) white vinegar (conditioner) and I now make my own deodorant based on the recipe from Treading My Own Path (link here  to the Deodorant).   The batch I made in early June, and keep in a small jar,  is still going, have used less than a quarter of the jar.  there are a few other deodorant recipes around that I want to try, so once I make and trial them I will share the info.

I don’t use a lot of makeup , and I switched to Natio products years ago.  It’s an Australian company, plant based products and importantly does not test on animals. I use a tinted moisturiser, blush, mascara and eyeliner, mostly now only when I go to work, not sure why only for work,  habit/work face/?,  so what I have lasts a long time.  (An update from this on 11.8.17, is I now only use sorbolene cream as a cleanser and moisturiser and mascara when I go to work.)

I also use lotion bars which I made and are very quick to make – see the recipe on this blog  link.  As well as trying to use up all the multitude of moisturisers/hand creams that seem to breed in the bottom drawer in the bathroom.  That is the next stage of my de-clutter.

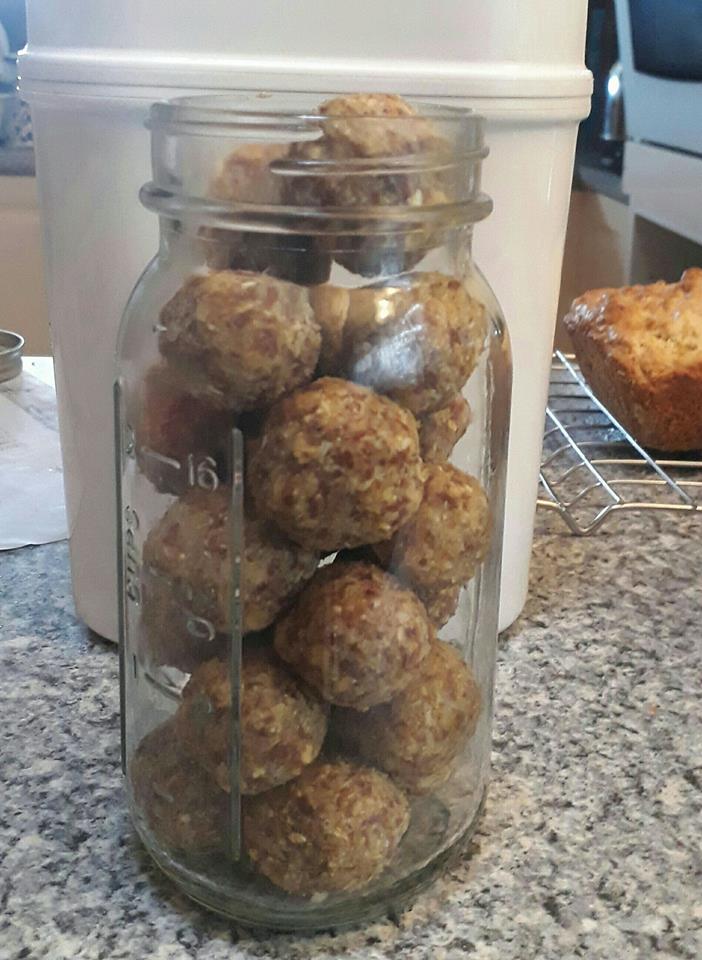
Note to family and friends with my 50th coming up – no more things in plastic or made of plastic – I know you love to give me things, but really I have enough stuff to last me a life time so I will be happy just to see you.   If you must, I would appreciate you making me something as simple as linen bags, or small produce bags (see Pinterest for lots of ideas), seeds for my garden, I am after a rhubarb cutting so that would be great, I love food so a homemade batch of cookies/muffins placed in a recycled tin, wrapped in a teatowel, OR if you really must, a bottle of wine is always appreciated, especially if it goes along with a slow afternoon of conversation and a plate of nibbles. However, I digress again..

The other area I have been researching is how to recycle beauty products as I seem to have a drawer full of things I have not used for years and I don’t want it just to go into landfill, so have hung onto them. My daughter also does not use a lot of makeup, only when she goes somewhere special like her graduation, 2 years ago or to a friends party!

I have found that Terracycle does recycling of items that cannot go in the council recycling bins see here: http://www.terracycle.com.au/…/beauty-products-recycling-pr… for lots of other things that can be recycled

In my area, Southern Adelaide there are three collection points, one at Woodcroft Community Centre, another at Naturalism Morphett Vale and one at Willunga Environment Centre.

So I will need to check out Terracycle and see what can be recycled as I have a lot of products that I have not used and don’t wish to such as lipstick, nail polish, new black eyeliners??

Anyway, time to get off the bed and go outside with a cuppa to chat to the chooks, plant some broad beans and pick some mandarines…
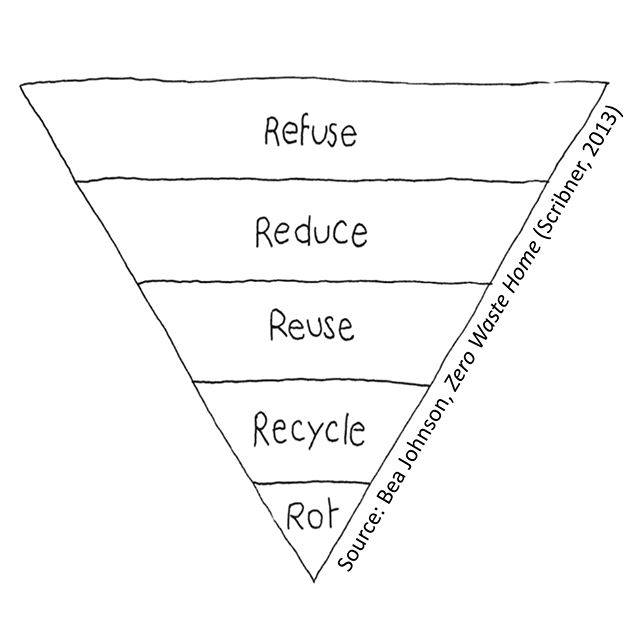